 Belgium
 Canada
 Germany
 Italy
Italy France
 Spain
Spain United Kingdom
 System Protection
Windows Server Backup uses drive imaging technology for data protection. BackupAssist allows you to take advantage of this backup functionality. The result is a feature-rich, reliable and cost-effective data and disaster protection solution. This document explains how to protect your computer using BackupAssist System Protection, including how to create a backup, manage configurations and restore data and applications.
Licensing
System Protection is a standard feature included with the BackupAssist license, and requires a BackupAssist license once the initial trial period has expired. Please contact your local BackupAssist reseller or distributor for pricing information, or visit www.BackupAssist.com.
For license key activation / deactivation instructions, visit our Licensing BackupAssist page.
Online User guide
Implimentation Considerations
System Protection supports image backups on the following operating systems:
- Windows Server 2016 from v9.5 (does not include CSV support)
- Windows Server 2012 R2
- Windows Server 2012
- Windows Server 2008 R2
- Windows Server 2008
- Windows 10 32-bit / 64-bit
- Windows 8.1 32-bit / 64-bit
- Windows 7 32-bit / 64-bit
For a full list of the platforms supported by BackupAssist, see the bottom of our Supported operating systems page.
Note: System Protection cannot incrementally back up data from a ReFS formatted drive (source). This means a full backup of all selections will take place each time the backup job runs.Backup Considerations
Before creating a backup job, it is important to understand what backup and restore options are available. This section provides guidance on some key considerations.
Exchange VM Detection
If your backup job contains a Hyper-V guest with an Exchange Server, the authentication information for that guest should be entered into the Exchange VM Detection tab on the Selection screen when you create the backup job. With these credentials, BackupAssist can detect what guests have an Exchange Server, and list the EDB file available for each guest when you perform a restore using the Exchange Granular Restore console.
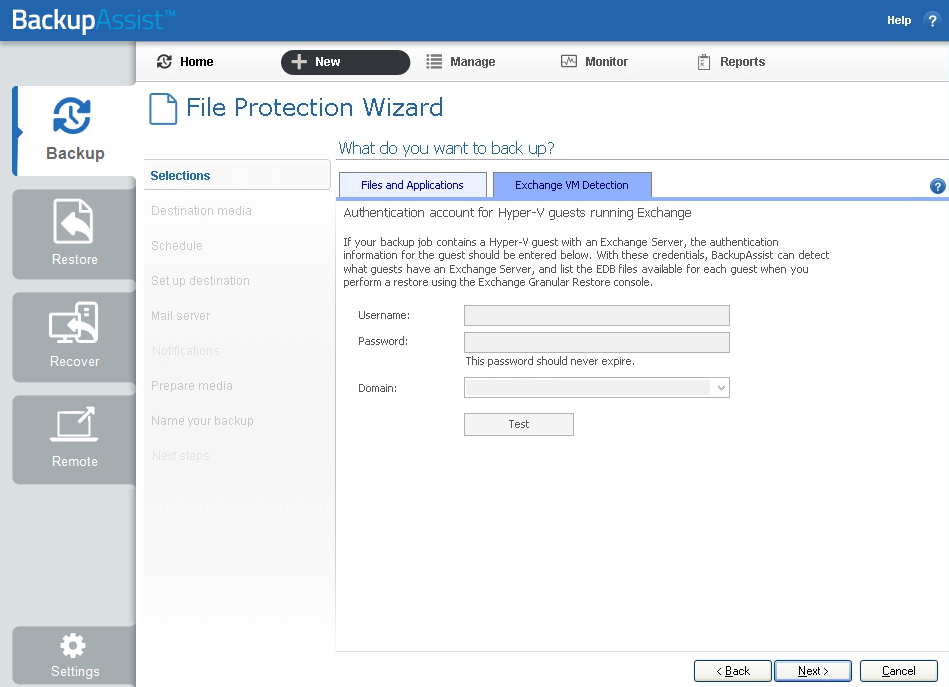
The Exchange VM Detection tab will appear when the Hyper-V role is installed and running on the server. If you are backing up multiple Exchange guests, each one should have the same username and password.
Hyper-V process is automated but the restore requires both the Exchange Granular Add-on and the Hyper-V Advanced Add-on licenses.
Restore vs. Recovery
A restore is the process of accessing a backup and restoring it to the original (or a new) location, if your data is lost, corrupted or if you want an earlier version of that data. However, if your computer cannot start itself, you may need to perform a recovery.
A recovery is the process by which a computer is recovered after hardware has been replaced or an operating system failure has occurred, and your computer can no longer start itself. To perform a recovery you need a bootable media to start your computer, and an image backup that the bootable media can use to recover your operating system, data and applications.
System Protection can create the image backup used in the recovery process. It can also create an image backup to protect data and applications so they can be restored onto a functioning computer (as explained in this guide). These two capabilities make System Protection a powerful and versatile backup technology. It is important to understand the difference between restore and recover so that both solutions can be implemented effectively.
The Recovery using a System Protection backup section of this guide, explains how a System Protection image backup is used in the recovery process.
For more information on data recovery, see the System Recovery guide.
Bootable Backup Media
If you create a System Protection bare-metal backup on an external USB hard disk, the media can be made into a Bootable Backup Media. The backup media can be used to boot into a RecoverAssist recovery environment and recover the server, without a separate boot disk.
The backup media will be made bootable the first time the job runs unless you deselect the Make media bootable with RecoverAssist tick box on the Set up destination step. When creating a backup job, selecting Prepare on the Prepare media step will generate a Destination Check Report. This report will advise if the backup media cannot be made bootable.
After you run the backup job, the backup report’s Recovery section will note if the backup media was made bootable or if the boot information was updated. If the media is not bootable, you will need to run the RecoverAssist builder, to manually make the backup media bootable, or make a separate, standalone RecoverAssist media.
Each time the backup job runs to a bootable media, the following checks will automatically take place:
- If a newer version of RecoverAssist is released, it will be applied to the bootable media.
- If a bootable media is created under a trial version, it will be updated if a license key is purchased.
- If the operating system being backed up changes, the media will be updated to support it.
Data containers
A Data container is an image file that backups can be stored in. It is selected on the backup Destination screen and configured in the Set up destination screen. You can configure the Data container’s size or allow it to use all available space on the destination.
Considerations
- The Data container’s size will increase as data is added until it reaches the set size or fills the backup destination, if Use all available space was selected.
- The Data container is created the first time the backup job runs, or if you run a destination check.
- A destination check is run on the Set up destination screen for fixed media, and when portable media is prepared on the Prepare media screen.
- If you set a maximum size, that maximum size cannot be changed one the Data container has been created.
Advantages of Data containers
Maintain Backup history
BackupAssist System Protection creates full and incremental image backups. Windows VSS maintains historical information so that each incremental backup can be restored from. On RDX drives and network destinations (e.g. NAS), VSS is not supported so Windows cannot maintain any backup history. This means restores can only be performed from the last backup.
Data containers overcome this Network/RDX destination limitation. The Data container is created on the destination media and each time the backup jobs runs, the Data container is mounted and treated as a local disk. Because the container is seen as a local disk, Windows VSS can maintain historical information of data that changed, and every backup can be restored from.
RDX granular restore
When Windows detects an RDX drive, it will compress the data that is being backed up. This compression means that individual files cannot be restored. By using a Data container, Windows will see the destination as a local drive and not compress the data.
Portable backups
On Windows 2008R2 and later, you can copy a backup image to another device, but only the last backup can be restored because you cannot copy the shadow copy (VSS snapshot). If the backup is in a Data container, the snapshot can be moved and all backups can be restored from.
Data container options
Windows Server 2008 - 2TB limit
- Uses VHD Data containers.
Windows Server 2016, 2012 R1/R2 and Window 8/8.1 - up to 64TB
- Uses VHD for Data containers 2TB and smaller (Required by default for Linux-based NAS devices).
- Uses VHDX for Data containers larger than 2TB.
A VHDX Data container will be created if the Data container’s size is set at 2TB or more, or if it is allowed to Use all available space on a destination that is 2TB or larger.
If you configure the Data container to be 2TB or smaller, or allow a Data container to grow into the available space on a destination that is 2TB or less, the Data container will use VHD.
Migrating from VHD to VHDX
If there is no VHD Data container at the backup destination, a Windows Server 2012 backup job will create a VHDX Data container when a backup job runs. You can therefore change from VHD to VHDX by archiving and removing the existing VHD Data container, and allowing the backup job to create a VHDX container when it runs next. The backup job must of course be configured to create a 2TB or larger Data container. Alternatively, you can convert the VHD to VHDX.
Microsoft provides instructions on converting VHD to VHDX using Hyper-V Manager and PowerShell.
To learn more, see the Data container resource page.
Helpful hint: BackupAssist automatically mounts Data containers when backups and restores are performed. However, there may be times when you want to do this manually. For example, if you want to check what is inside a Data container or have it available for another task. To manually mount a Data container, please refer to the steps outlined in our blog article.
BackupAssist Settings
When creating a backup job, there are some global settings that should be configured in BackupAssist. If they are not configured, you will be prompted to complete them during the creation of your first backup. It is recommended that this is done in advance.
BackupAssist's settings can be entered and modified using the selections available in the Settings tab. Clicking on the Settings tab will display the selections as icons. Four of these are used when creating new a backup job and each one is described below:
Backup user identity
Backup jobs require an administrator account with read access to the data source, and full read-write access to the backup's destination. It is recommended that a dedicated backup account is created for this purpose. The account's details are entered using this menu item, and your backup jobs will be launched using these credentials. The account's permissions will be validated both when the backup user identity is entered and when the job is executed. If no account is specified or the account has insufficient permissions, the backup job will fail and note the error in the backup report.
A video explaining the creation of a backup user identity can be found on our, Videos Webpage.
Email server settings
This menu item is used to enter the details of the SMTP server used by BackupAssist to send email notifications. The SMTP server must be configured if you want to have an email Notifications step included when you create a backup job.
Email address list
This menu item is used to define and store the email addresses of potential notification recipients. The list will be used to populate the recipient selection screen when configuring an email notification for a backup job. Any email addresses entered during the creation of a new notification are automatically added to the Email address list.
Network paths
This option allows you to enter access credentials for networks, domains and drives that the default account (specified in the Backup user identity) does not have access to. Enter or browse to the location and add it to the Path list. The Edit option will allow you to enter an authentication account, specifically for that path. When you create a backup job to a remote location, that location will be automatically added here.
Having multiple connections to a resource using the same logon credentials can generate a Windows error, such as the BA260 NAS error. It is therefore recommended that you avoid having mapped shares on the computer running BackupAssist that are the same as the paths configured in BackupAssist.
Windows Settings - Enable image tracking
System Protection creates a full backup the first time it runs. Subsequent backups are incremental. To create an incremental backup, BackupAssist scans and compares the data to be backed up and the data in the destination image to see what data changed. The process can take a long time, but when Enable image tracking is selected, System Protection backups record the changes to the data using a virtual snapshot. This means the backup job only needs to look at the snapshot to see what data changed. The result is significantly faster backups.
Enable image tracking is enabled by default under the Incremental backup tracking for System Protection section, in the Windows Setting screen.
To learn more, visit our article on making faster incremental image backups.
Creating a System Protection Backup
The following instructions describe how to create a backup job using BackupAssist System Protection.
Launch BackupAssist and follow the steps outlined below:
1. Select the Backup tab
2. Click Create a new backup Job
3. Select System Protection
If this is the first time you have created a backup job, you will be asked to provide a Backup user identity if one has not been defined.
4. Selections
The selections screen is used to select the data and applications that you would like to back up. Any VSS applications detected will be displayed here as application directories.
There are two selections to choose from:
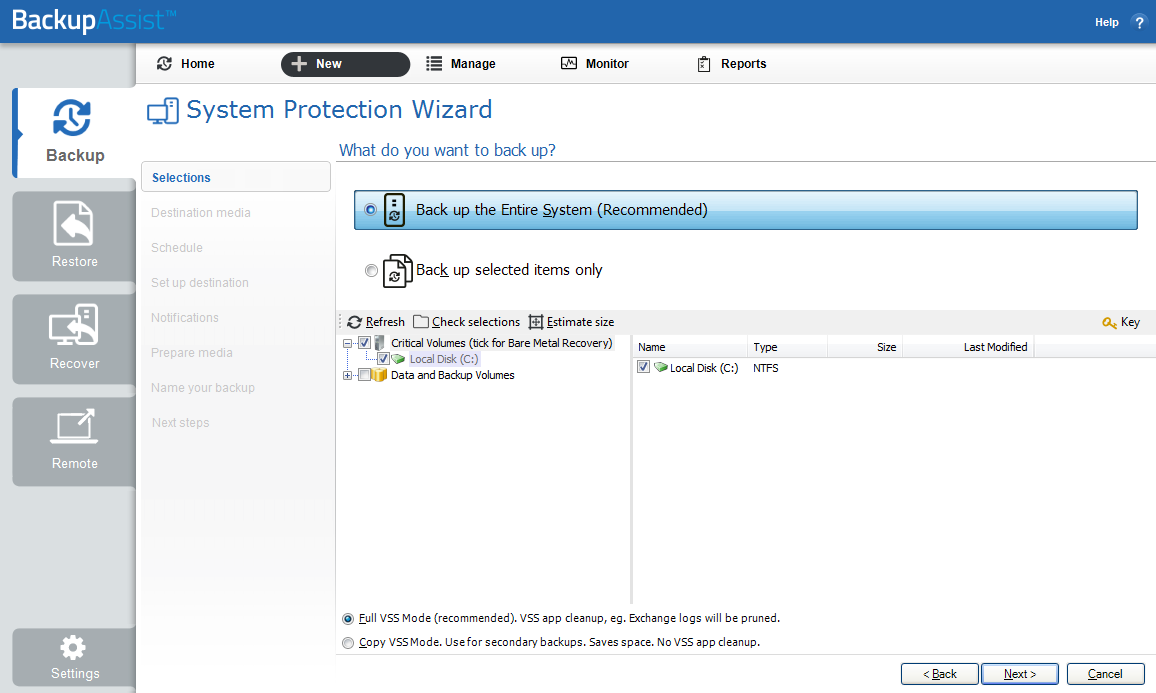
Data selection screen
- Back up the Entire System . This option will create an image of your system that can be used to perform a full recovery of your computer. The Critical Volumes are selected by default and include bare-metal recovery data.
- Back up selected items only . This option is used if you only want to create a backup of files, folders and applications. The option will allow you to deselect Critical Volume's (bare-metal) and select specific VSS containers and drives.
You can select specific data within a drive (e.g. C:) if the back up is to a Removable disk. To do this, modify the backup job after you save it using the Manage menu on the Backup tab.
Critical Volumes is required for a bare-metal backup. The backup can be used with a bootable recovery media to recover your computer, after hardware has been replaced or an operating system failure has occurred and your computer can no longer start itself.
5. Destination media
The destination screen is used to select the type of media that you want to back your data up to. This step's name will change to the media type selected, when you click next.
Select a device for your backup destination, and click Next.

Destination media
Enable BitLocker encryption
This option is available for Windows servers that have BitLocker installed. BitLocker can be used to encrypt External disk and RDX drive backup destinations. This protects the drives from unauthorized access. When enabled, BitLocker will encrypt and lock each drive, and assign an encryption key which can be used to unlock and access the drive.
- A USB flash drive containing the encryption key must connected to the server running BackupAssist, to allow BackupAssist to access the drive when you backup or restore data.
- The encrypted drive will be assigned a password that can be manually entered to unlock an encrypted drive when you want to restore data or perform a recovery using RecoverAssist.
To learn more, including how to install BitLocker, see our Using BitLocker resource page
Enable Data container
This options is available for the following destinations: RDX drive, Local hard drive, Network location and External disk. A Data container is a file that the backups will be stored inside of. The Data container is created on the destination media and each time the backup jobs runs, the container is mounted and treated as a local disk.
On Windows 2008R2 and later - backups on RDX drives cannot be used to restore individual files unless Data containers are used.
To learn more, see the Data container resource page.
6. Schedule
This screen is used to select when and how often you would like a backup job to run and how long you would like the backup to be retained for. A selection of pre-configured schedules, called schemes, will be displayed.
- The schemes available will depend on the type of destination media selected in step 4.
- Clicking on a scheme will display information about the schedule used.
- The schedule can be customized after the backup job has been created.
Select an appropriate scheme, and click Next.
To learn more about scheduling options and customizations, see the Backup tab user guide.
7. Set up destination
This screen is used to configure the location of the media selected in step 4. The options presented will change with the type of media selected.
Configure your backup destination, and click Next.

Set up destination
BitLocker encryption
To encryption the backup destination, you will need to provide:
- A drive letter of the USB drive used to store the encryption key. An encryption key is saved for each encrypted drive, and is used to unlock the drive when you backup and restore data.
- A password that will allow you to manually access any drive encrypted by this job when you perform a restore or a recovery. This password is saved in the backup job.
Data containers
The container size and location is set using this screen:
- For an RDX or External disk destination, Use all available space will be selected by default. It is important to review this setting to ensure it is appropriate.
- For a Local hard drive and Network location, set the size manually by using the field provided, or select the Use all available space option.
- The size of a Data container cannot be changed once the backup job has run.
- Selecting Use all available space will allow the Data container to grow into the available space.
Bare metal bootable backups
If you are doing a bare-metal backup to an external hard disk, a Bootable Backup Media option will be displayed and selected by default. This feature allows your backup media to boot into a RecoverAssist recovery environment and recover the server, without a separate boot disk.
Destination check report
If you are using a Local media & Local network destination, a Check destination button will be available to check your backup destination for possible problems. After the checks have been completed, the results can be viewed by selecting the Report link. If you are using Removable media destinations, these checks are performed when you select Prepare on the Prepare Media step.
8. Notifications
Once a backup job has completed, BackupAssist can send an email to inform selected recipients of the result. This email notification can be enabled during the creation of a backup job, if the mail server has been configured.
To enable email notifications:
a. Select, Add an email report notification.
b. Enter recipients into the Send reports to this email address field.
c. Enter recipients into the Also send reports to this email address field. You can then select the condition under which the email should be sent, using the drop-down box.
To learn more about notification options, see the Backup tab user guide.
9. Prepare media
If you selected a portable media device as your backup destination, you will be given the option to prepare and label the media. The label allows BackupAssist to recognize the media and ensure that the correct media is being used on the correct day.
For example, if you put an RDX drive in on Tuesday but it was labelled Wednesday, BackupAssist will warn you that the incorrect media has been detected.
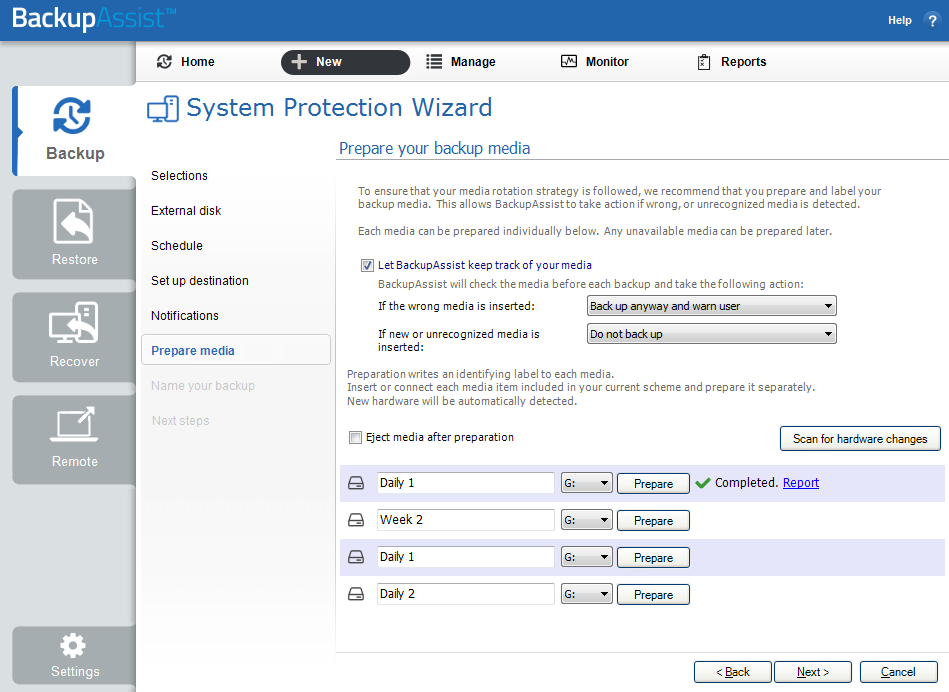
Prepare media
BackupAssist will display a list of media based on the backup schedule you selected, and the Number of disks for daily backups, selected on the Set up destination screen.
To prepare the media and enable media tracking:
- Select, Let BackupAssist keep track of your media.
- Select what you want BackupAssist to do if an incorrect or unrecognized media is inserted.
- Enter the label you want added to each media in the text field provided. Default label names are provided, based on your backup schedule.
- Select Prepare for each media device. Prepare will be selectable when the media is attached.
If you have selected BitLocker encryption, use the prepare media button to indicate what drives are to be encrypted. The encryption process will be initiated by the final backup job creation step.
Destination Check Report
Selecting Prepare will generate a Destination Check Report. The report will advise if any problems were detected with the media. If Make media bootable with RecoverAssist was selected in the Set up destination screen, the report will also advise if the media can or cannot be made bootable.
10. Name your backup
Provide a name for your backup job, and click Finish.
11. Next Steps:
- If you are creating a backup of your entire system for use in a recovery, you can use this option to launch the RecoverAssist builder and create and bootable recovery media.
- If you selected BitLocker encryption, the encryption can process will begin. When you select finish, the BitLocker encryption tool will open and encrypt the prepared drives. If an unencrypted drive is used for a BitLocker backup job, the job will fail.
To learn about the BitLocker encryption tool, see our BitLocker resource page
Your System Protection backup job has now been created.
Important: Once the backup has been created, it should be checked. You can check the backup by performing a manual test restore, or using the Backup Verification feature. A manual restore is the only way to fully test a backup, and regular manual restores should be part of your backup solution.
Backup verification is an automated process for testing backups. A manual restore is the only way to fully test a backup, and regular manual restores should be part of any backup solution
Restoring from a System Protection Backup
The Restore tab displays the restore options available. This section provides instructions on how to use the Local and Network Files restore option, which is used to restore files and folders and VSS applications that do not have their own specific restore option.
The other restore options are documented in technology specific guides, as follows:
- For Hyper-V Host File and Hyper-V Granular restore, see the Hyper-V Protection guide.
- For SQL Server and SQL Point-in-Time restores, see the SQL Protection guide
- For Exchange Server and Exchange Granular restores, see the Exchange Protection guide
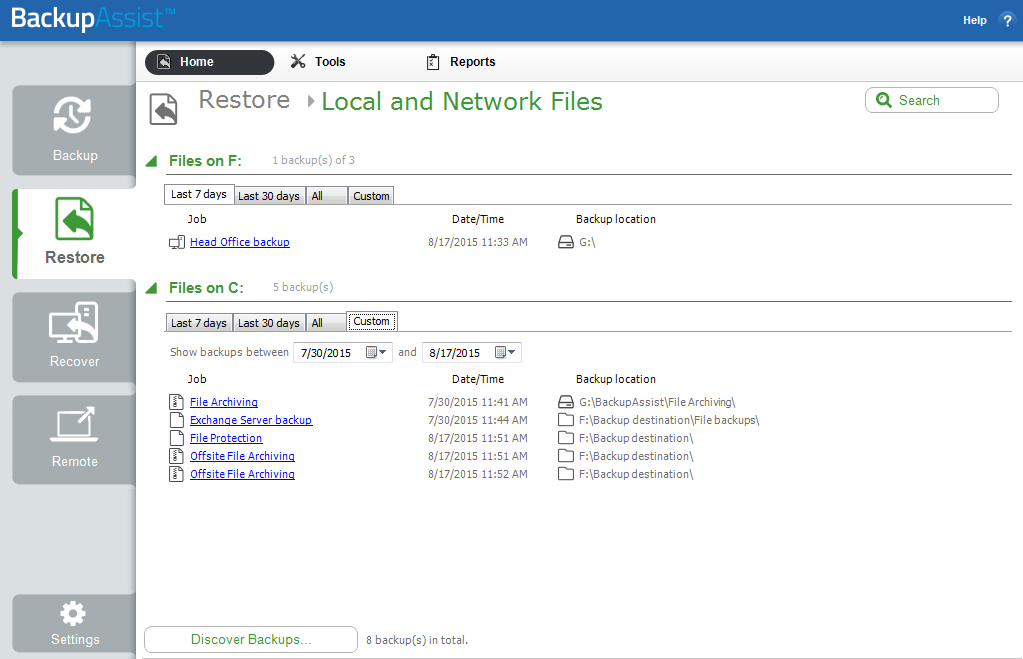
To restore data from a System Protection backup, follow these steps:
- Select the Restore tab
- Select Local and Network Files
- The Last 7 days and Last 30 days tabs can be used to display the backups within those ranges.
- The Custom tab allows you to select a specific date range and display backups for that period.
- The Backups section allows you to use the Jobs Filter, to limit the search to specific backup jobs. You can also use the Backup Date filter search within a specified date range.
- The Search section is used to enter a search term associated with the name of the file you want to find. The Search for field will take the string provided and search for occurrences of that string within a file or directory name. The results of the search are displayed by backup. To perform a restore, select the file or files that you want to restore and select the Restore button.
- Select the backup that you want to restore from
- Select the files, folders or applications that you want to restore
- Use the left pane to locate and select the data that you want to restore.
- The right pane will display the contents of the folder selected in the left pane.
- Select Where to restore the data to
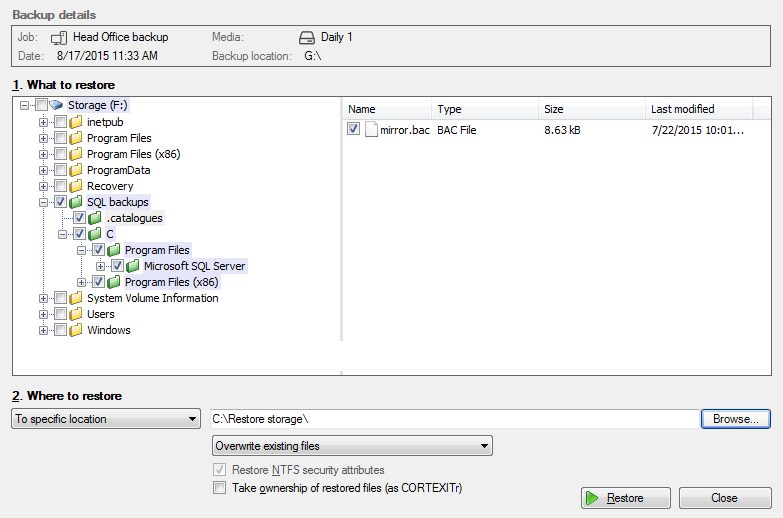
- Under Where to restore select To original location or To Specific location.
- Use the Browse button to locate and select the restore destination.
- Use the drop down box to set the overwrite rules. The overwrite rules will apply if the files being restored encounter files with the same name in the restore destination.
- Overwrite existing files - The restored files will overwrite files in the restore destination.
- Do not overwrite existing files – The restored files will not overwrite files in the restore destination. This means the files will not be restored.
- Only overwrite older files - If a source file has changed since the backup was made it will not be overwritten.
- Review the Restore NTFS security attributes option
- Review the Take ownership of restored files option
- Select Restore
- Select Done
The Restore tab has a Home page and a Tools page. The Home page is the default page and the recommended starting point for performing a restore. The Tools page should only be used by experienced administrators or users being assisted by technical support.
This will display the volumes backed up by this installation of BackupAssist. It can also show backups from other machines added using the Discover Backups button, which is explained below.
Backup selection
Expand a volume to display all of the backups available for that volume. There are tabs above each volume’s backup list to help locate the required backup.
The Search button allows you to locate files to restore across multiple backups. When you select Search, the Restore console will display the Search page.
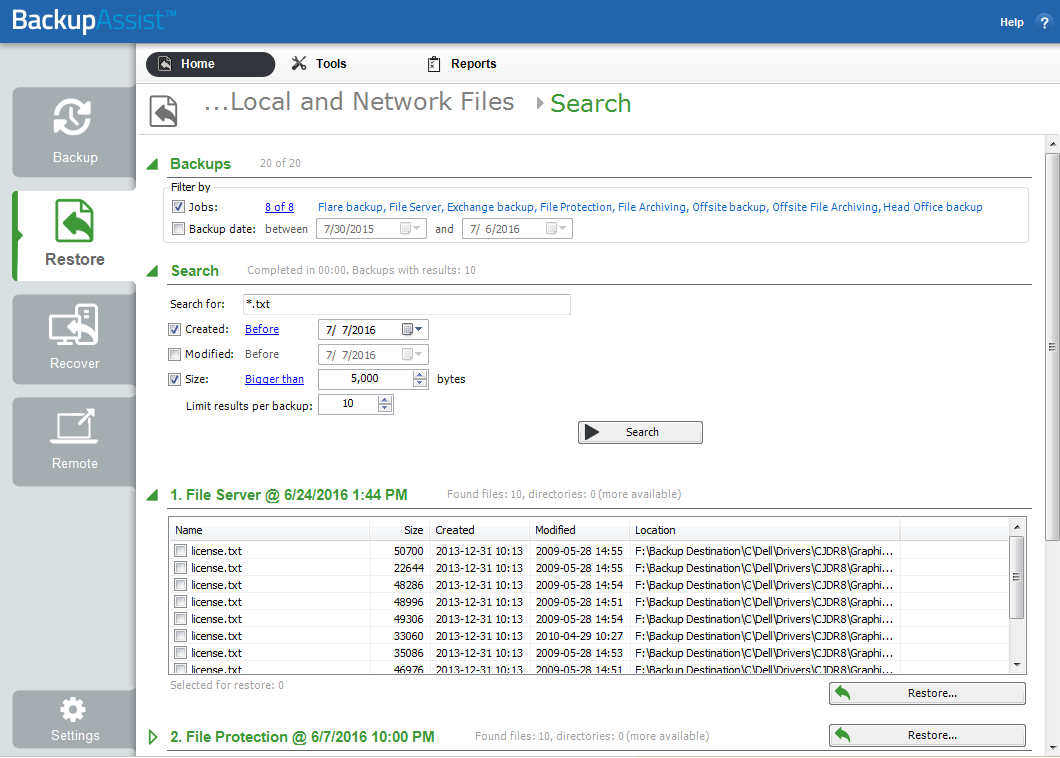
To refine the search, use the Created, Modified and Size options. Ticking any of these options will activate a drop down list of variables to select from. For Created and Modified, you can select a date using the Calendar selection fields. For Size, you can select the file size in bytes.
The Discover Backups button allows you to browse for backup catalogs created by deleted jobs and other servers. Selecting those backups will add them to the list of available backups.
Clicking on a backup’s name will open the Integrated Restore Console (IRC). The Integrated Restore Console is used to select the data to be restored, where to restore it to and the restore conditions.
Integrated Restore Console
Follow these steps to select the restore destination and restore options:
You can select:
If you select this option, the NTFS security attributes the file had when it was backed up will be retained when the file is restored. The NTFS security attributes can be viewed in the Security tab on the file’s Properties
Selecting the Take ownership of restored files tick box will give the current user ownership of the restored files. The user is shown to the right of the text box description.
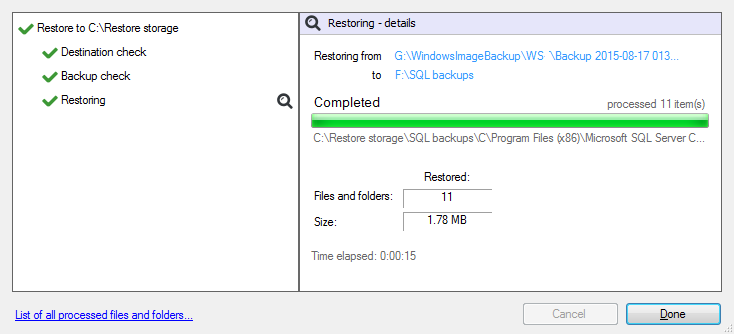
Restore monitor
When you select the Restore button, the restore process will begin. The Integrated Restore Console will display information about the restore job and provide status updates as the job runs.
Selecting List all processed files and folders … will open notepad and display a list of the files restored, including their full path.
BitLocker Encrypted backups
If your backup is encrypted, you will be prompted for the encryption password when the restore job accesses the backup. It is important that you keep a copy of your password in a safe place, as we cannot assist you with opening password-encrypted files if your password is lost or forgotten.
You can also use the encryption key to unlock an encrypted drive, by connecting the USB flash drive. BackupAssist will use the key to unlock the drive you are restoring from. You will not be prompted to do anything other than the normal restore steps.
Once the restore has finished, selecting Done will return you to the main UI.
Your System Protection restore has now been completed.
Helpful hint: BackupAssist automatically mounts Data containers when backups and restores are performed. However, there may be times when you want to do this manually. For example, if you want to check what is inside a Data container or have it available for another task. To manually mount a Data container, please refer to the steps outlined in our blog article.
System Protection Backup Management
Once you have created a backup job, you can modify the settings and access advanced configuration options using the management screen.
To access the backup management screen:
1. Select the BackupAssist, Backup tab.
2. Select Manage from the top menu. A list of all backup jobs will be displayed.
3. Select the backup job you want to modify, and select Edit.
4. Select the required configuration item on the left. Key configurations are described below.
To learn more about the backup management options, see the Backup tab guide.
Destinations:
Data container options
You can modify the size settings of a Data container, if the container does not exist. For example, if the backup job has not been run or if the container has been manually deleted.
To modify the size select Destination and go down to Data container options:
- Container size (GB): Use the up and down arrows to set the size of the Data container.
- Use all available space: Tick this box and all available space on the destination device will be used by the Data container, up to 2TB.
Backup storage options
This option is used to determine how space is allocated for shadow storage on a removable backup destination. Shadow storage is used by VSS to store historical backup data from previous backup jobs.
There are two options available: :
- Use all available space for backup history.
- Manually manage space for backup history
- For Windows Server 2008, right click the drive and select Configure Shadow Copies
- For Windows Server 2012 and later, open the drive’s properties, select the Shadow Copies tab and access the Settings.
- You can view the amount of space reserved for the shadow copy storage by running the command vssadmin list shadowstorage at an elevated command prompt.
- You can change the amount of disk space allocated to the shadow copy storage in GB or as a percentage of the disk, using the following commands:
With this option, BackupAssist makes all free space on the backup destination available for storing historical backups. The exact amount of the space used changes with time, depending on the amount of space used by the latest backup and other data.
With this option, Windows is used to determine the shadow storage size. You can allow Windows to automatically determine the size, or manually manage the size yourself using either the Windows Server settings or the vssadmin tool.
To set the size using the Windows Server settings:
To set the size using the vssadmin tool:
vssadmin Resize ShadowStorage /For=X: /On=X: /Maxsize=XX%
vssadmin Resize ShadowStorage /For=X: /On=X: /Maxsize=XXGB
This will resize the limit to XX size for drive X:
The use all available space for backup history option is equivalent to “vssadmin Resize ShadowStorage /For=X: /On=X: /Maxsize=UNBOUNDED”.
To see more VSS admin commands, please refer to this Microsoft VSS admin resource.
For guidance on what the size should be, see our article on Image backup destinations.
Scheduling
Selecting Scheduling will display the Scheduling options. You can use this screen to change the following settings for your scheme's daily backups: the time the backups run, how many times a day the backups run and the days of the week each backup runs on. If you selected a scheme with archive backups (e.g. weekly, monthly), you can also specify when each archive backup will run. The current scheme is shown, along with two pop-up menus: Select a new schedule and Customize schedule.
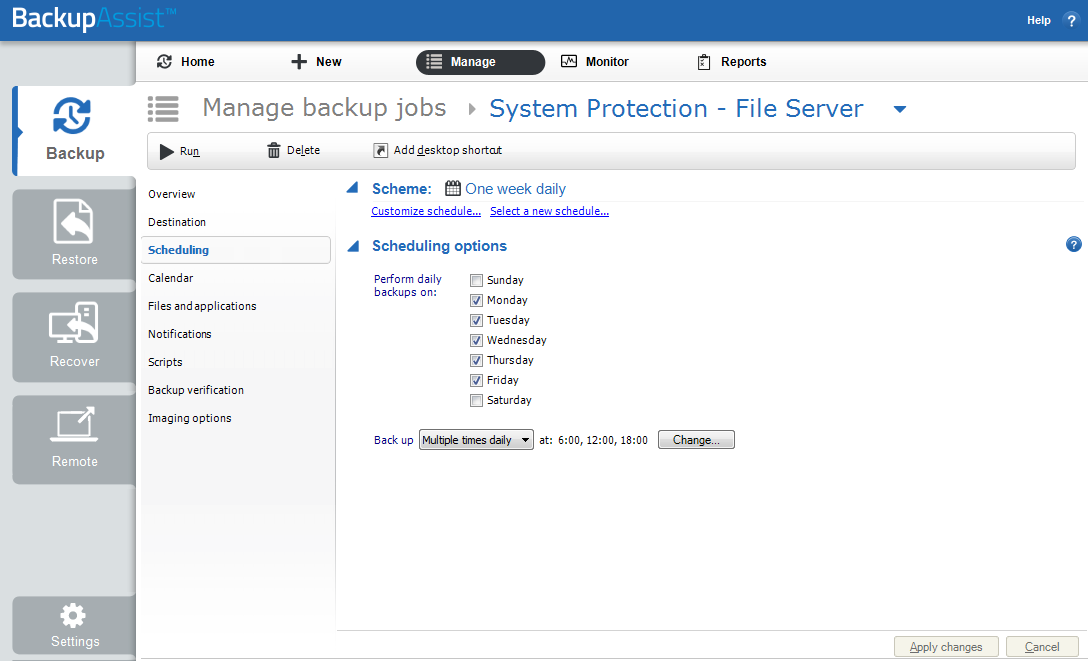
System Protection backup - Manage menu
Select a new Schedule: This will display the pre-configured backup schemes that you chose from during the creation of your backup job. The selections available will depend on the type of destination media you have selected. You can select a different scheme using this option.
Customize schedule: This selection can be used to modify each scheduled backup within your current scheme. The customizations available will depend on the type of backup media used.
The Method selection can only be Automatic. This is because when a System Protection backup job runs, it scans the data, identifies what has changed and updates the backup image (VHD file) with the data changes. This means you have a full image backup that is updated incrementally. In some circumstances (a new destination or a change to the backup job) a full backup will still be performed.
Selecting the Incremental Windows Image Backups option on the Settings tab (under Windows settings) makes Windows flag any data that changes, so that when a System Protection backup job is run, it does not need to scan the data selection to know what has changed. This makes the backup a lot quicker, but there is a performance overhead between backups due to Windows keeping track of the changed data. Also in some circumstances (a change the backup job's settings or destination media) a full scan may be required.
For additional information on the Scheduling screen, please refer to the Backup tab guide.
Files and applications
A new System Protection backup job will back up an entire disk or application. However, under the Files and applications menu item, you can modify your backup job by selecting specific files and folders, or individual components within a VSS application.
The Volume Shadow Copy Service (VSS) is a Microsoft Service that creates a copy of an application's data (e.g. Exchange and SQL) so the data can be backed up without interfering with the application. BackupAssist will automatically detect locally running VSS applications and list them for selection during the Destination step of the backup job creation. In some cases, only applications that are currently running will be detected. If an application is not listed, try re-starting it and then click the Refresh button in BackupAssist.
If your backup job contains a Hyper-V guest with an Exchange Server, the authentication information for the guest should be entered into the Exchange VM Detection tab. Select the File and applications > Exchange VM Detection tab. With these credentials, BackupAssist can detect what guests have an Exchange Server, and list the EDB file available for each guest when you perform a restore using the Exchange Granular Restore console.
Hyper-V process is automated but the restore requires both the Exchange Granular Add-on and the Hyper-V Advanced Add-on licenses.
Imaging options
Imaging options provides configurations that can be applied to an existing System Protection backup.
VSS backup mode
The VSS Full / Copy options allow you to set how VSS views the backup. A full backup is recommended as it allows VSS to prune logs that would otherwise grow and consume disk space.
Shadow Copy Protection Mode (SPM) is a solution for backup jobs that are losing backup history. In rare instances, VSS can delete backup history when the backup job is having trouble writing to the backup destination. This can occur in backups that use low performance (iSCSI / NAS with Data container) destinations. SPM allows a failed write by the backup job to be retried. If the retry does not work, the backup job will stop and report a failed backup job. No backup history will be lost.
Shadow Copy Protection Mode should only be used if you are experiencing backup history loss.
- If you are unsure if you have lost history, try a test restore from your oldest available backup.
- If you are using iSCSI / NAS with a Data container, try to resolve the problem by improving the performance of your network or backup destination, and use SPM if the problem persists.
There are two space management options with Shadow Copy Protection Mode:
- The GB selection is used to reserve space for SPM for storage management purposes.
- The storage space percentage bar, allows you to specify the amount of space reserved for historical backups. As the full backup grows, historical backups are deleted to make room. However, you can specify a % of protected space within which the historical backups cannot be deleted. These will be the most recent historical backups, and the backup job will report that the destination is full, rather than write over them.
The full backup can use the reserved space, if the space is not being used by historical backups. For example, if 12.5 % is reserved on a 1TB drive, then 125GM will be reserved for historical backups. If the historical backups are only using 100GB, then the full backup can use 25GB of that reserved space.
BackupAssist manages the space at the backup destination for System Protection backups.
- If you are using Shadow Copy Protection Mode, you can set the percentage of protected storage space for the backup history.
- If you are not using Shadow Copy Protection Mode, the percentage of protected storage space is not managed by SPM so the bar will be set to BackupAssist’s default of 12.5%
Quick Catalogue:
Selecting this option means the cataloging phase is done without mounting the VHD (Virtual Hard Disk) file. That means that the catalogue does not contain the details of the files and folders that were backed up, it only contains the other metadata associated with the backup, such as backup destination, VSS metadata and VSS snapshot ID.
Because the quick catalogue does not contain an index of files and folders, you cannot search for a specific file or folder in the restore console.
The restore console does allow you to browse the files and folders in the backup, however it does this by mounting the backup VHD rather than using the data in the catalogue. This means that the backup must be available.
System Protection Backup Report
The reporting capabilities of BackupAssist greatly enhance the reliability and accuracy of backup jobs.
Below are some key sections of the backup report:
Errors / Warnings Summary
Shows the status of the backup, plus a list of any warnings or errors. This is displayed at the top of the report so you can see any important messages quickly.
Destination Check
Shows any problems encountered with the backup’s destination, such as incorrect backup media being detected (due to human error in the media rotation process) or if no media is detected at all.
Recovery Options
This section explains the BIOS, EFI and Hyper-V guest recovery options available for each System Protection backup.
Backups (Restore points)
This new section will list all of the backups you have on the backup destination. This will make it easy to see what restore options are available, and how far back you can restore from.

Media usage
This section breaks down the space available at the backup destination for both the disk space and shadow storage. Shadow storage is used by VSS to store historical backup data from previous backup jobs. The example below shows the media usage report section for a Data container.
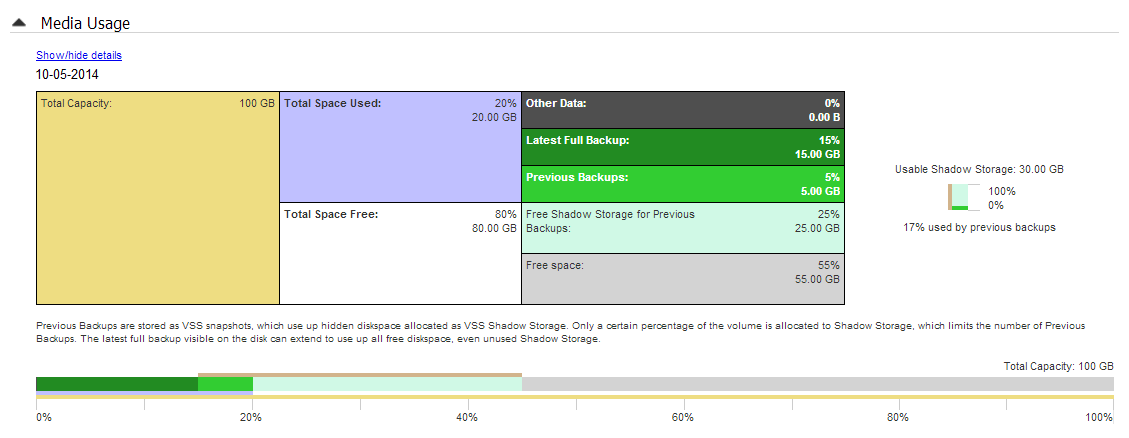
Total Capacity of the backup destination is shown on the left. The usage graph breaks this amount down into Used and Free space, and then into more detailed allocations, such as shadow storage.
System Protection Backup Strategy
A good backup strategy is important to protect your company in every recovery scenario. There are five critical points to consider when setting up a backup strategy. Each point is described below.
Last known recovery point
One very important factor to consider is that your backups should provide you with a last known good point for recovery. Consider the following story.
Some malware / virus infections may go undetected for several days. If the infection happened 3 days ago, and the only backup available is last night's backup, then the backup is effectively useless. However, if there is a backup from 3 days ago (just before the infection) then the server can be restored to the last known good point.
It is not always possible to know when your last known good point is - so for this reason it is important to have a variety of backups from different points in time. That means you need more than one backup medium (i.e. more than one disk to store your backups). These disks are then commonly divided into different sets - one set of backup media (in this case, disk) for daily backups, and another set of backup media for weekly backups. BackupAssist also gives you the option of having monthly and yearly backup disks for additional security.
Multiple removable media
When using a backup destination such as USB hard drives or RDX drives, it is recommended that multiple disks/cartridges are used as part of the rotation strategy. Due to the nature of Windows Imaging backups, the number of different points in history that we can restore from is correlated to the number of devices used for the backups.
|
Backup Device |
Recommended Number of Disks/Cartridges |
|
USB Hard-drive |
3 to 5 or more |
|
RDX drive |
5 or more |
Running a test restore
In addition to running backups successfully, the integrity of backups should be checked, on average, once a month to ensure that they are restorable. By frequently running a test restore, you will be able to confirm that the backups can be used in a real restore scenario. Test restores also give you practice in the restoration process so that you are aware of the steps and what is required.
Offsite storage of backup media
In order to protect your company data from physical events like natural disasters or theft of hardware, backups should be taken offsite and kept in a secure location. Although it is important to keep some backups on-site to be able to restore data quickly, is equally important to keep at least one backup a week off-site.
Keeping backups off-site enables users to restore their servers in the event of any such disasters. The convenience of being able to restore data immediately from on-site storage of backups should not deter users from also storing backups off-site.
We suggest that you store the daily backups on-site and the weekly backups off-site. (BackupAssist can even help you manage off-site backups using the Internet. For more information, visit our online product page: http://www.backupassist.com/BackupAssist/tour_Rsync.html)
Imaging backup scenarios
Imaging daily
When running a Windows Imaging backup daily to a removable device, a good strategy would be to use 5 disks - for example, 2 for daily backups and 3 for weekly backups. The two daily disks can be rotated across the daily backups (i.e. Monday and Wednesday's backup goes to Daily 1 and Tuesday and Thursday's backup goes to Daily 2). The three weekly disks can be swapped across the three weeks and the most recent weekly backup can be stored off-site. With multiple disks for the backups, you have a variety of restore points from which to choose. It is possible to alter this strategy - for example, 3 daily backup disks and 2 weekly disks, or 3 daily disks, 1 weekly disk and 1 monthly disk.
Imaging weekly
If there are constraints (excessive amounts of data, limited physical access to the server or procedural constraints) that make it impossible to image your system daily, it is still possible to have an effective backup system in place by running a Windows Imaging backup on a weekly basis.
For example, this scenario will still enable you to recover a system in the event of a disaster:
- Perform the drive imaging backups on a weekly basis (with 3 or more drives to enable media swapping).
- Use a different backup technology, such as a BackupAssist File Protection, to back up your applications and data on a daily basis.
In the event of a disaster, you can restore your system to the last image and then "roll forward" your data and applications from your daily backup.
Block Level Backup Technology
The concept of full and differential backups through block-level backup technology is different to the traditional concept of full and differential backups found with file-based backups. When a backup of a disk is performed using block-level backup technology, the backup engine will create a full or a differential backup based on the comparison of the current state of the disk and any previous backups of that disk available on the backup destination. If there are no backups of the drive on the backup destination, the backup engine will create a full backup of the drive at that destination. Any subsequent backups of the drive to the same backup destination will be differential backups based on the differences between the current state of the disk and the backup on the destination.
Let us take a look at a situation where you are backing up C: drive to an external hard-drive on Monday (refer to Monday's backup in the figure below). If you imagine C: drive as being made up of blocks A, B, C, D, E, F, G, H, then the first block-level backup of C: drive to the USB hard-drive will be a full backup.
All subsequent backups of C: drive to the same external hard-drive will be differential backups where only the differences are backed up. If you run another backup of C: drive on Tuesday (refer to Tuesday's backup in the figure below), the differences will be backed up to the external hard-drive to create a new full backup.
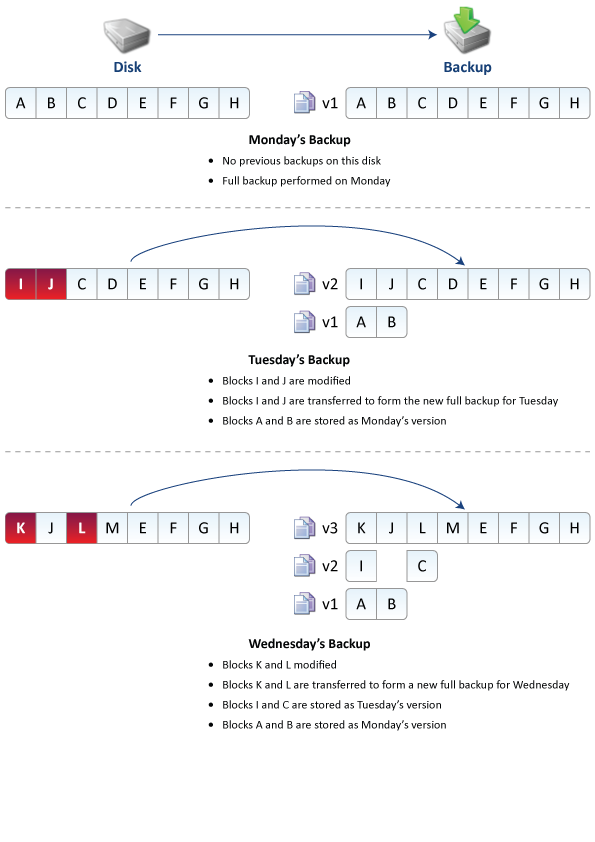
Upon examination of the backup destination (refer to Tuesday's backup in the figure below), you notice that:
- The most recent full backup (I-J-C-D-E-F-G-H) is always available.
- Past backup versions (A, B) are always available.
Block-level backup is space efficient as only the block-level differences are stored. In addition, the previous backup versions get deleted as the drive gets filled up.
If you run a third backup of C: drive on Wednesday (refer to Wednesday's backup), the block-level backup engine will compare the current state of C: drive to the full backup on the destination and backup only the changes. Once again, the backup destination will show:
- Most recent full backup is always available. Now, it is K-J-L-M-E-F-G-H.
- Past backup versions available.-(A, B), (I, C)
When the backup device is full, the oldest backups are automatically discarded. E.g. In the first backup v1 of blocks A & B would be deleted to free up space. If more space is required, the second backup of blocks I & C would be deleted next.

