 Belgium
 Canada
 Germany
 Italy
Italy France
 Spain
Spain United Kingdom
 File Protection and rsync
BackupAssist File Protection includes a powerful tool called rsync that can back up data across the internet to any rsync host. Adding rsync backups to your backup strategy is an excellent way of insuring yourself against data loss. Critical files can be copied to a secure, offsite location away from your home or office. Additional storage space can be easily added to the data host as your data requirements grow, so you don't have to worry about purchasing replacement hardware.
- Rsync setup guide: Explains the options available for an rsync destination, and how to set up your own rsync host for different platforms.
- Rsync user guide: Explains how to back up data to an rsync host using BackupAssist File Protection, and how to restore that data.
Both the setup guide and user guide are included in the online version below.
Licensing
To back up data across the internet with rsync, requires the BackupAssist for Rsync Add-on license, once the initial trial period has expired. For license key activation / deactivation instructions, visit our Licensing BackupAssist page.
Online setup & user guide
Rsync Technology
Overview
Rsync uses a checksum method to perform the bit level data transfer. Rsync checks whether any data has changed by looking at the size of a file and its modification date. If no data has changed, rsync will not transfer the data, saving time and bandwidth. If files do not match, rsync uses a checksum method called a rolling checksum on the changed file to see what has changed. It will then transfer only the altered or appended data within the file.
Rsync can manage data that has been inserted, added, removed and shifted, with a minimum transfer overhead. In real terms, that means efficient use of your bandwidth and data allowances. As rsync will only transfer data that has changed (and knows when file alterations have occurred), your internet backups will take less time when compared other remote backup methods, such as FTP.
Terminology
In order to avoid confusion about the use of the words client, server, Windows Server and rsync server, we will use the following terms to avoid ambiguity:
Data Host - The remote machine that will be used as your backup destination.
Rsync Server - The same as the data host, but specifically referring to the machine running rsync that accepts incoming connections and data from Rsync clients.
Rsync Client - A machine that contains your working data (typically a file server) that has BackupAssist installed. BackupAssist comes packaged with the Rsync libraries necessary to transfer data to the Rsync Server during a backup.
Implementation
To help better understand how Rsync transfers work, let's take a look at a hypothetical three day backup scenario.
The scenario examines three different backup methods: Rsync, FTP and incremental drive imaging.
Day 1: We begin with a 4GB data file backup.
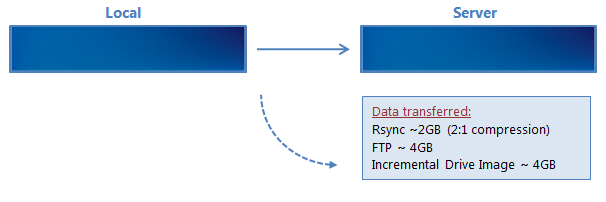
Looking at this first backup we see that for the initial data transfer there is a 100% transfer for both Incremental drive imaging and for FTP. Thanks to Rsync's packet compression we see a 50% reduction in the initial transfer. Depending on your Rsync server's setup this initial overhead can be removed by seeding your backup server locally, a method we will discuss later in this paper.
Day 2: On the second day we have added a further 0.1 GB to the start our data file.
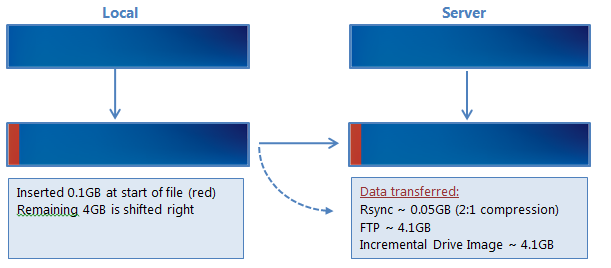
We can see that both FTP and incremental drive imaging perform a full backup of the file. Rsync only backs up the changed data within the file, and compresses the sent data, resulting in a 50mb transfer.
Day 3: This day no data has been added, but data has been shifted within the file.
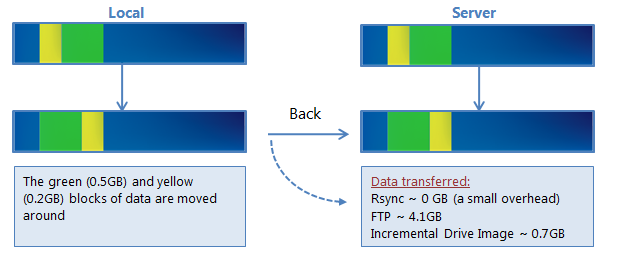
Rsync is able to recognize that the data is already on the backup server and will reorganize the file with a minimal instruction file. Incremental drive imaging is also aware that the data was moved, however it must re-backup the moved data as this section does not match the data source. FTP once again has to do a full backup of the source data.
Summary
As demonstrated in this example, Rsync delivers substantial performance gains. With the ability to check what data is still the same, then append, remove or modify it as necessary to match the local source it can greatly reduce backup overhead.
The key benefits of Rsync:
- Improves offsite backup speed through bandwidth optimization
- Reduces network data transfer by transferring only new data
- Open standard protocol for maximum compatibility and flexibility in backup destination selection
Rsync Data Hosts
As Rsync is an open protocol, you have the option of either storing your data on a third party rsync host server, or supporting an rsync host server yourself.
For more information on how to get the most out of Rsync, visit our Video Presentations page.
Third Party & S3Rsync hosting
Third party data centers, ISPs and cloud providers can support Rsync backup destinations. These solutions have the advantage of high availability networks and scalable storage.
BackupAssist includes a dedicated configuration screen for backups to Amazon S3 via the S3Rsync service ( www.S3Rsync.com). To backup to Amazon S3 with Rsync you will need:
- Amazon AWS S3 account (aws.amazon.com/s3/)
In your Amazon Web Services account, you will need to obtain your Access Key ID and generate a Secret Access Key. Then you will need to create an S3 bucket to use for your backups. See http://www.labnol.org/internet/tools/amazon-s3-simple-storage-service-guide/3889/ for a guide to the Amazon S3 Simple Storage Service.
- S3Rsync account (www.s3rsync.com)
When you sign up for an S3Rsync ( www.S3Rsync.com) account, you will be given a username and a private SSH key file. Save the SSH key file somewhere on the machine on which you wish to run BackupAssist.
- BackupAssist
You can set up your rsync backup job in BackupAssist using the S3Rsync Destination selection. See the Creating a File Protection backup using Rsync section of this guide for more information.
Do-it-yourself hosting overview
Any rsync Server such as an rsync-enabled NAS device, a Windows Server or a Unix machine can be used to store backups using rsync. The do-it-yourself approach has the advantage of keeping data in your control and a lack of monthly hosting fees.
Rsync servers can be one of two types:
- Rsync over SSH (preferred) runs Rsync via a secure shell (SSH, port 22) which means all traffic over the internet is encrypted. User access control is modified by editing user accounts on the server.
- Daemon mode runs Rsync as a normal TCP/IP service. User access control is modified by editing the Rsync.conf file. Internet traffic is not encrypted. To learn more, review our online article Configuring BackupAssist for Rsync without SSH , under the section, Altering the rsyncd.conf file.
In the following sections, the Windows and Linux data hosts support Rsync over SSH. However, some NAS devices do not, and Daemon mode must be used instead. Daemon mode is still an acceptable solution provided a secured LAN/WAN (such as site-to-site VPN) is used.
Do-it-yourself hosting: Windows Rsync host
To set up a Windows machine to act as an Rsync Server , you will first need to install both SSH and Rsync. We recommend CopSSH and cwRsync. An installer for each can be found on our website by visiting http://www.backupassist.com/rsync.
Prerequisites:
- Windows Server 2008 or 2012 machine with network connectivity and space to store backup data.
- Windows Server 2008 or 2012 are ideal platforms due to their support for both backup histories and single-instance store in Rsync backup solutions.
- Windows Small Business Servers (SBS) should not be used as Rsync hosts.
- The cwRsync installer.
- The CopSSH installer.
- BackupAssist v5.4.8 or later installed on a separate Windows machine (designated Rsync client).
Installing cwRsync:
1. Run the cwRsyncServer installer.
2. Continue through the install wizard, installing the package to a location of your choice.
3. During the installation you will be presented with the popup on the right. We suggest leaving the SvcCWRSYNC account as is. Write down the password provided.
4. Click Install to install the package. Once this is finished cwRsync will be present on your system.
Installing CopSSH:
1. Run the CopSSH installer.
2. Continue through the install wizard, installing the package to a location of your choice.
3. During the installation you will be presented with the popup on the right. We suggest leaving the SvcCOPSSH account as is. Write down the password provided.
4. Click Install to complete the process of installing CopSSH on your system.
5. During the Activate user part of the installation, you will be presented with a popup showing the service status and any active connections. At any time after the install you can access Activate a user from your start menu to allow SSH access to that user. You must activate at least one user before you can register an Rsync client.
6. Click OK to continue your installation.
Activating a user
If you are planning to use SSH, then before you register a BackupAssist client with your Rsync server, you must activate a user with CopSSH.
1. In the Start menu, under All Programs -> CopSSH, select. The CopSSH Control Panel will open.
2. To start the process to activate a user, click on the Users tab across the top of the user interface.
3. Click on the Add button to bring up the wizard to activate a user.
DO NOT ACTIVATE USING YOUR ADMINISTRATOR ACCOUNT. Doing so will cause a lock down on the account due to CopSSH's security settings. We recommend activating a newly created account.
4. Click Forward on the opening screen.
5. On the second screen, select the Domain and type in the user which you wish to activate.
Click Forward once complete (admin is a manually created account we'll use for this example).
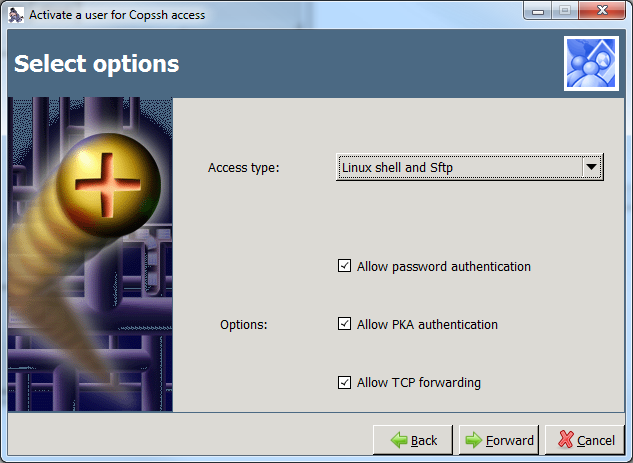
6. Change the Access Type to Linux Shell and Sftp using the drop-down menu.
Leave all Options enabled as they are by default.
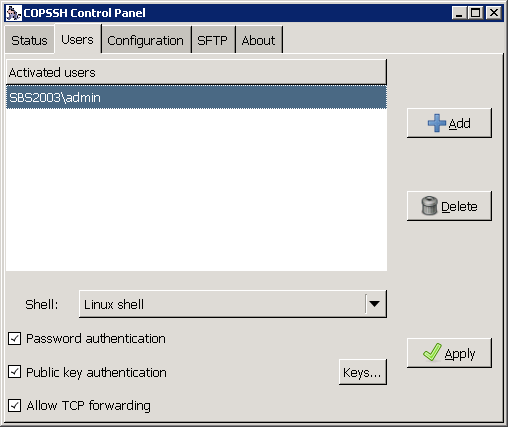
7. On the fourth screen, click on Apply to complete the wizard and activate the user.
The user should now be showing as activated within the CopSSH Control Panel.
Your user's home directory will be located at (for example) C:\Program Files\ICW\home\user.
The location of this directory can be changed by editing the file C:\Program Files\ICW\etc\passwd.
Note : If you uninstall the CWRsync server, be aware that the Windows service users SvcCOPSSH and SvcCWRSYNC are not removed. So if you then re-install the CWRsync server package the Windows users cannot be recreated because the passwords will not match. This ultimately means the COPSSH and rsync services will not start on the server. The fix is to uninstall and remove the users manually then re-install to add the users again with known passwords.
Do-it-yourself hosting: Linux rsync host
Most FreeBSD and Linux servers can be used to host backup data. BackupAssist has two requirements: that the data host has an SSH server and rsync installed. All major Linux distributions (such as Fedora, RedHat Enterprise, Ubuntu, Debian) have these two prerequisites available as install options. The most common SSH server is OpenSSH.
Note : You can choose to run rsync as a daemon on your Linux server. (For security reasons, we do not recommend this - use rsync over SSH instead.) If you choose to run rsync in daemon mode, you will not need to have the SSH service installed. For instructions on setting up BackupAssist to connect to an rsync daemon please view the Configuring the BackupAssist client for a NAS server section below on page 8.
To determine if your system has the prerequisites installed, log into your system, start a shell and type:
man rsync - this should return the man page for rsync if installed. Type 'q' to exit the man page.
man sshd - this should return the man page for sshd if installed. Type 'q' to exit the man page.
You should use your distribution's software package manager to install these packages, if they are not already installed. Most commonly they can be found under the Server or Security categories. The next step is to create logons on your data host. We recommend creating a separate logon for each client. For example, if you host data for 5 different companies, create 5 different accounts so that each company will only be able to see their own data. You should also make sure that each client's home directories are on a partition that contains sufficient space to host their data.
You must also change the permissions on each user's home directory, otherwise most SSH daemons will not allow you to connect to the server using the public/private key method (which BackupAssist uses). To do this, use the chmod command - for example for a user "fred", type in the following (when logged on as root): chmod 700 /home/fred
Do-it-yourself hosting: NAS rsync host
Backing up to an rsync-enabled NAS can be a very effective solution. The advantage of using a NAS is that, as an appliance, it can be close to a turnkey solution and easier to manage. Each NAS is different and some support rsync over SSH, whereas others only support rsync Daemon mode. There is however a list of requirements that must be met in order for BackupAssist to connect to the device.
To use your NAS as an rsync data host you will need:
- A NAS that is running rsync as a daemon, or one that has rsync and an SSH service running.
- Setup a share to act as a root directory for your rsync backups and allow read and write permissions to that directory.
- If your NAS requires a password to connect to the rsync service, you will need BackupAssist to authenticate to it.
- Your NAS will need to have the correct ports open for your rsync Daemon or SSH service (873 and 22 respectively).
The options vary from device to device. You will need to consult your manual to setup the destination.
Below is a selection of NAs vendors that support rsync
Do-it-yourself hosting: host configuration tips
The following table contains tips designed to address common mistakes and highlight considerations that will help you set up an rsync host.
Tip |
Description |
Make sure it's rsync compatible |
When you select hardware to use as an rsync server, make sure the hardware can support the rsync protocol. |
Processing speed is important! |
Rsync can be a very processing intensive protocol - it uses checksums that calculate what data needs to be transferred. |
Ensure there is plenty of disk space available |
Although you may think you have enough disk space available when you first implement your rsync solution, a common cause of rsync problems is that the storage space eventually runs out. |
Make sure you set the correct backup path |
Some NAS devices contain a boot partition (similar to Windows Server 2008R2). Sometimes, if you enter the incorrect path your rsync backup will write to this boot partition – which could in turn cause major issues with your backup and hardware. |
Seed your backup |
If you’re planning on using a NAS device, you can run your seed backup by connecting your NAS device directly to the local network. This avoids having to seed to a USB drive, and then running the seed to the NAS device in a two-step process (saving you a lot of time). |
Double check permissions |
Even though you are logged in as a Domain Admin, most NAS devices require users to be set up locally within the unit and have permissions configured locally as well. If you receive permission issues, this is usually the reason as to why. |
Rsync Backup Considerations
The performance and flexibility of backing up across the internet can depend on how Rsync is implemented. Below are some key considerations when planning your rsync backup solution.
Setup considerations
Backup user accounts
Rsync backup jobs require a BackupAssist administrator account with read access to the data source. This is set up using the Backup user identity, option in the Settings tab. The backup job will also need an rsync host account with read-write access to the rsync destination. This is enabled on the host server, and entered in the rsync destination screen.
Data Seeding
Rsync backups are incremental backups. The first time you perform your backup, no data will exist on the data host so a full backup will be required. Seeding your backup via an internet connection may not be practical, so two methods are provided to seed your data host. These are explained in the rsync backup management section of this document.
Backup source & frequency
Run your rsync job regularly. Regular daily backups will ensure that you keep your data transfer to a minimum and your data up-to-date.
Simultaneous backups
If you have a large number of backup jobs sending data to a host at the same time, the connections may become unreliable. It is recommended that you limit the host connections 5 at a time. Depending on storage requirements and the bandwidth available, you may increase this number with caution.
Exchange databases and SQL databases
VSS applications including Exchange, SQL and Hyper-V, can be backed up to an rsync destination using File Protection. Simply choose the VSS application that you want to back up from the list of detected applications. You can even drill down and choose individual components (databases, storage groups, etc.) to backup. For Hyper-V, we recommended System Protection backups, which do not support the rsync destination but do support granular Hyper-V gest restores.
Synchronizing drive images using rsync
Rsync is a destination for File Protection backups. It is possible for the data source to be a System Protection image backup, but this solution is not recommended because significant performance issues that can arise. If you want to back up important files to an rsync host, the best way is to back up those files using File Protection directly. Continue to create your image backups, but back up the important files independently using a File Protection rsync backup job.
We also advise against using File Protection’s rsync, to transfer File Archiving backups to an rsync host. This is because rsync uses a checksum method to perform the bit level data transfer. Rsync checks whether any data has changed by looking at the file size and modification date. This is fast and simple on a regular file system, but if you have a very large single archive file (>10 GB) it will take much longer to complete, even if only a small element has changed.
Technology considerations
Using a NAS device as a data host
Many dedicated NAS devices offer built-in support for rsync. While this can be convenient to set up, many of these devices use low-powered processors which can result in reduced performance if you are backing up large files (several GB or larger in a single file). The example below illustrates the difference in backup time for a dedicated QNAP NAS, versus an ordinary desktop Linux machine. The initial backup is a single 18.8GB file. The second backup consists of about 200MB or changes to that file.
DEVICE |
QNAP TS-209 II with rsync |
Ubuntu 9.04 desktop with rsync |
Initial backup |
7 hours 55 minutes |
1 hours 22 minutes |
Second backup |
4 hours 57 minutes |
0 hours 35 minutes |
Data compression and encryption
BackupAssist supports encryption and compression on the server. BackupAssist for rsync offers industry standard encryption for data stored on the data host. This means that your data is safe "in the cloud", making external hosting a safe and secure option. Your files are also automatically compressed on the Data Host, which reduces the amount of disk space used on your hosting company.
Rsync for BackupAssist uses four types of compression:
- Effective transfer compression by only sending changed data.
- All data packets are compressed and encrypted during transfer.
- Single Instance Store (SIS) uses hard link technology to prevent the same files from being stored more than once across backups on your host.
- The source data is encrypted and compressed in an rsync-friendly way before transmission, effectively minimizing the space used by files on the server even further.
Note : If you enable or disable encryption for an rsync job, BackupAssist will need to re-seed the backup to the host with a full set of data (i.e. the next backup will be a full backup).
Note : Data compression has a significant performance impact when encrypting your files for rsync.
Single-Instance store
File Protection backups cannot use single-instance store when the backup is saved on a ReFS formatted rsync destination. This means all the data will be backed up each time the backup job runs.
Preservation of file attributes
Because rsync works on top of the Cygwin Unix emulation layer, it does not recognize Windows file attributes (e.g. read-only, hidden), NTFS security attributes (i.e. access control lists), NTFS alternate data streams or file creation times. The only file system attribute preserved when using rsync to transfer data is the Last modified time attribute.
BackupAssist's implementation of rsync overcomes this limitation by having the option to store NTFS metadata on the backup destination. This option is enabled in the Manage screen under Rsync options. This is checked by default for new jobs created in BackupAssist v7. If enabled, NTFS streams and security data will be saved to a separate file on the destination and then added back to the file as part of the restore process, when using the BackupAssist Restore Console. So while these attributes are not "preserved" on the files backed up to your rsync destination, they will still be restored.
This table outlines what attributes are preserved with the NTFS metadata option:
File attributes at destination |
Preserved |
Windows File Attributes |
|
Creation time |
|
Last access time |
|
Last modified time |
|
NTFS security (Access Control Lists) |
|
NTFS alternate data streams (ADSs) |
|
System State
Rsync cannot be used to create a System State backup. A System State backup is explained here.
Using rsync for files and directories
Rsync performs best when working directly on the file system, backing up normal files and directories. Rsync does not perform nearly as well synchronizing backup files offsite.
Below is an example of how rsync performs:
- File system with 50,000 files, 50 GB total
- 50 files of total size 50 MB have changed
Rsync is able to identify which of the 50 files have changed, and for those files, it determines what changed. It calculates checksums on 50MB of data, and can complete the backup in a matter of minutes. The amount of data transferred will be around 20MB for typical documents.
Compare this to a scenario where you use a File Protection backup job to transfer an image file created by a System Protection backup, to an rsync destination. In this example, the VHD is 50GB.
Rsync will detect that the single .vhd file has changed, and needs to determine the in-file deltas. It needs to calculate checksums on 50GB of data, which may take hours. Additionally, we have found that even if the underlying file system changes very little, about 10% of a .vhd file changes from day to day and needs to be transferred. So, about 5GB will be transferred.
We see here that it is greatly preferable in terms of bandwidth and CPU time the operate rsync on the underlying file system rather than a backup of that file system.
File size and the number of files
In theory, there is no limit to the number of files or directories that you can rsync. Even though rsync only transfers the data that has changed, it still must read all of the data in the file set to check what data has changed. This makes rsync internet backups a disk/CPU intensive operation that can take longer the more your data grows, no matter how little data has actually changed.
We recommend that wherever possible, you use one of the other backup methods provided in BackupAssist (such as BackupAssist's File Archiving) to regularly archive infrequently used data, so the amount of actual data in day to day use is minimized.
We have run tests on several different file systems - a typical file system of 70,000 files and 24 GB with fewer than 50 MB of daily changes can be synced in around 10 minutes. The largest file system we've tested is of 200,000 files and 100 GB, which took 20 minutes to sync minimal changes.
Creating a File Protection Backup using rsync
The following instructions describe how to create a File Protection backup job to back up your data to an rsync host.
Launch BackupAssist and follow the steps outlined below:
1. Select the Backup tab, and click Create a new backup Job
2. Select File Protection
If this is the first time you have created a backup job, you will be asked to provide a Backup user identity if one has not been defined.
3. Selections: The selections screen is used to select the data and applications that you would like to back up. Any VSS applications detected will be displayed here as application directory containers.
Select the volumes, folders, files and applications that you want to back up, and click Next.
4. Destination media: The destination screen is used to select the type of media that you want to back your data up to.
Select Rsync or S3Rsync for your backup destination, and click Next.
The S3Rsync option is for backups that use both Amazon S3 and the S3Rsync ( www.S3Rsync.com) service.
Select Enable Rsync file based encryption if you want the backup data to be encrypted.
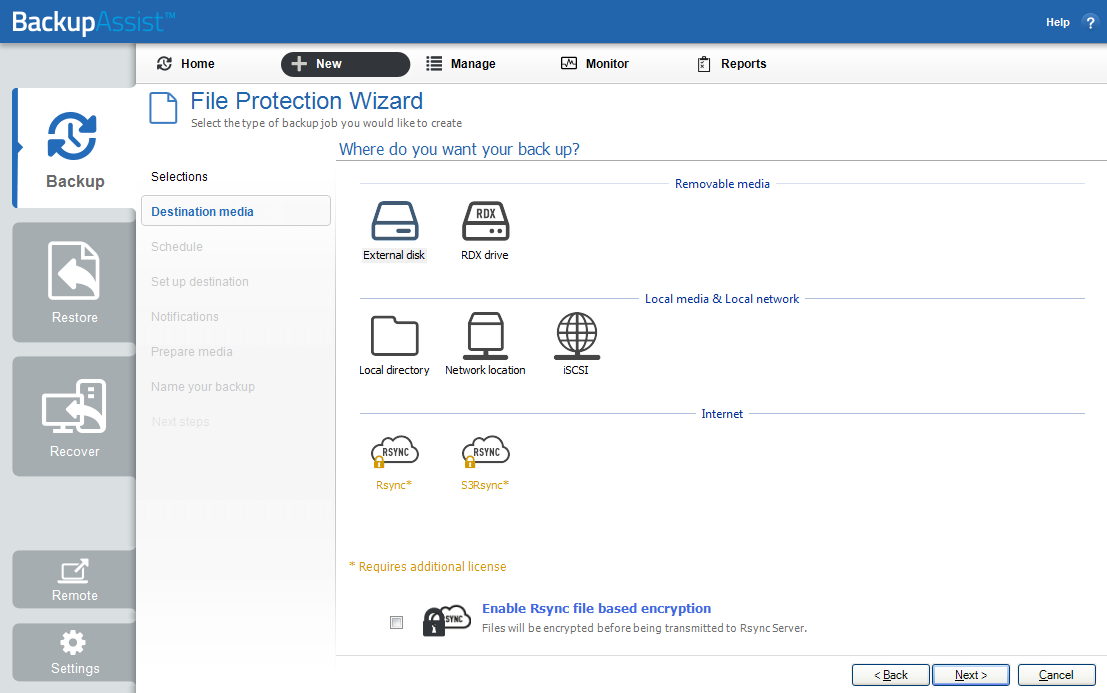
File Protection backup - Rsync destination selection
5. Schedule: This screen is used to select when and how you would like the backup job to run, and how long you would like the backup to be retained for. A selection of pre-configured schedules, called schemes, will be displayed.
- The schemes available will depend on the type of destination media selected in step 4.
- Clicking on a scheme will display information about the schedule used.
- The schedule can be customized after the backup job has been created.
For more information about creating custom schedules, refer to the Backup tab user guide.
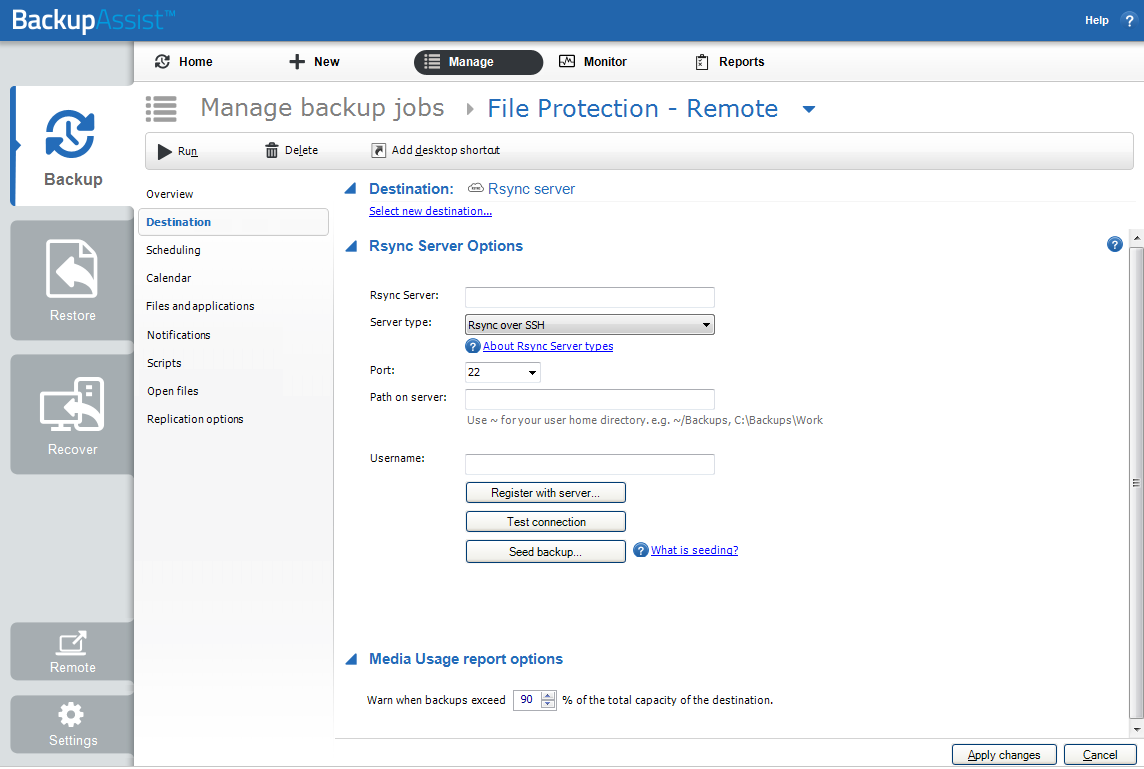
6. Set up destination. The screen is used to configure your rsync destination. The configuration screen displayed will depend on whether Rsync or S3Rsync was selected.
IF the standard rsync Destination was selected, follow the guidelines below:
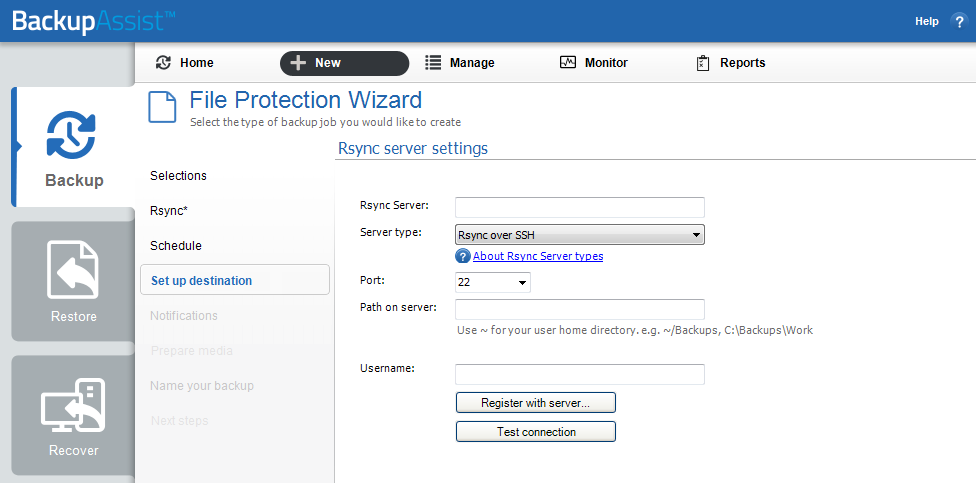
BackAssist File Protection - Rsync destination selection
a. Rsync Server: Enter your rsync server name (or IP address).
b. Server Type: Select Rsync over SSH, Rsync Daemon or Rsync Daemon over SSH tunnel.
c. Port: The default port will display for the server type selected.
d. Path on server: It is best to use a new, empty directory for this path. The parent directory must exist. The sub directories will be created when the job is first run: /parent/sub_directory/.
If your data host is running Windows, you can enter a normal Windows path here, such as "C:\Backups". You can also enter a path relative to the user's home directory by starting with a tilde ( e.g. "~/Backups").
If your data host is running Linux, you can use an absolute path by starting with a slash or a path relative to the user's home directory by starting with a tilde (e.g. "~/Backups").
e. Username: Enter the username that was activated when the rsync host was set up.
f. Register with server: Selecting this option will prompt you to enter the password. BackupAssist will then create a public/private key pair to authenticate you to the data host.
g. Test connection: Use this button to test your connection to the rsync server. If this step fails but the registration succeeded, the problem may be that the Path on server cannot be accessed.
IF the S3Rsync Destination was selected, follow the guidelines below:

BackAssist File Protection - S3Rsync destination selection
The information below is provided when you create:
a. Rsync Server: This should be farm.s3rsync.com (the default setting) unless you have been advised otherwise by S3Rsync ( www.S3Rsync.com).
b. Port: This should be 22.
c. Amazon S3 bucket: You can leave this blank unless you want to set up multiple backup jobs using the same bucket (not recommended).
d. Set Path: Specify any folders you have created in the bucket.
e. Access Key ID: Enter your S3 Access Key ID.
f. Secret Access Key: Enter your S3 Secret Access Key.
g. S3rsync username: Your username supplied by S3Rsync ( www.S3Rsync.com). (note: this is different to your Amazon username).
h. S3Rsync SSH key path: The location of the saved SSH key file provided by S3Rsync ( www.S3Rsync.com).
i. If you selected Enable Rsync file based encryption, you will be prompted to create a password.
Once you have set up your rsync destination, click Next
Note: It is important that you keep a copy of your password in a safe place, as we cannot retrieve passwords if they are lost or forgotten.
For information on configuring S3Rsync, see the Third setting Party data host: up S3Rsync section of this guide.
For information on configuring S3Rsync, see the Rsync setup guide.
For information on configuring Amazon S3 go to http://www.backupassist.com/blog/support/using-backupassist-for-rsync-with-amazon-s3/
Once you have set up your Rsync destination, click Next
Mail Server: If you have not configured an SMTP mail server for BackupAssist, you will be prompted to provide those details after the backup destination step has been completed. See the BackupAssist settings section for guidance.
7. Notifications: Once a backup job has completed, BackupAssist can send an email to inform selected recipients of the result. This email notification can be enabled during the creation of a backup job, if the mail server has been configured.
To enable email notifications:
a. Select, Add an email report notification.
b. Enter recipients into the Send reports to this email address field.
c. Enter recipients into the Also send reports to this email address field. You can then select the condition under which the email should be sent, using the drop-down box.
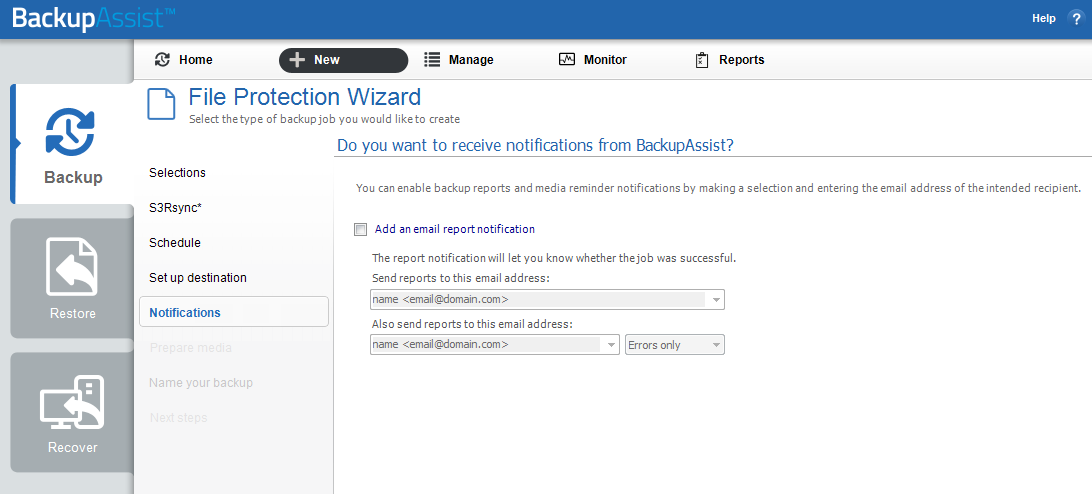
File Protection - Notifications setup
After the backup job has been created, you can modify the notifications by adding and removing recipients, setting additional notification conditions and including print and file notification types.
To learn more about notification options, see the BackupAssist Backup tab whitepaper.
8. Prepare media: This step will be skipped because rsync backups do not use removable media.
9. Name your backup: Provide a name for your backup. Click Finish.
The File Protection with rsync backup job has now been created.
Important: Once a backup job has been created, it should be reviewed and run using the Manage menu. This menu provides additional options to configure your backup. See the section, File Protection using rsync backup management for more information.
Important: Once the backup has been created, it should be checked. You can check the backup by performing a manual test restore, or using the Backup Verification feature.
Backup verification is an automated process for testing backups. A manual restore is the only way to fully test a backup, and regular manual restores should be part of any backup solution
Restoring from a File Protection Backup
This section provides instructions on how to restore data that was backed up using BackupAssist's File Protection using rsync.
To restore data from a File Protection backup, start BackupAssist and follow these steps:
1. Select the Restore tab
The Restore tab has a Home page and a Tools menu. The Home page is the default screen and the recommended starting point for performing a restore. The Tools menu should only be used by experienced administrators or users being assisted by technical support.
2. From the Home page, select the type of restore you want to perform. When you select one of the restore categories provided, BackupAssist will locate the corresponding backups for you.
- Files and folders will display all data backups and all VSS application backups.
- Applications will display backups that contain VSS applications, and exclude data only backups.
- Exchange , SQL or Hyper-V, will display all backups that contain the selected application. Selecting an application type will display application specific restore tools (e.g. Hyper-V Granular Restore and SQL Restore) as well as the Restore Console.
3. Once you have selected the type of restore you want to perform, the Home page will display all backups catalogued by BackupAssist that match your selection. The backups will be grouped by the backup's source location, and by the restore tool that can be used.
· If a backup can be used by two restore tools, it will appear in two groupings.
· If a backup contains data from multiple locations, it will appear in a grouping for each location.
If your backup included both data and VSS applications, both will be available to restore once the backup has been loaded in step 4, regardless of the restore type selected.
Select the Restore Console.
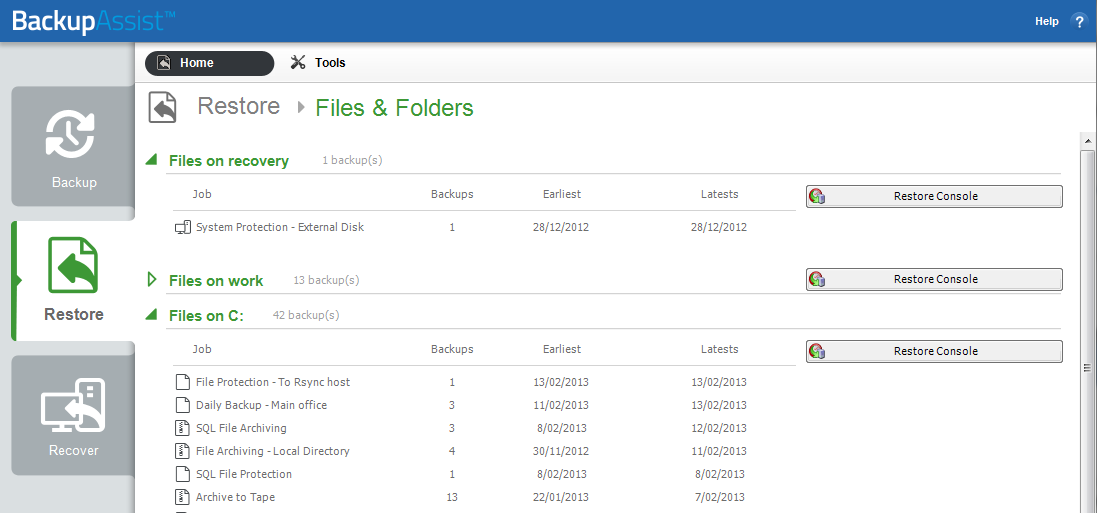
BackupAssist Restore Home page - selection results
4. Restore console - backup and data selection
The BackupAssist Restore Console will open and load all of the backups that were listed on the Home page. The next step is to locate the data you want to restore, from the loaded backups.
The Restore Console provides two tools to locate your data:
- The Browse tab. Select this tab if you know the backup and date you wish to restore from, or if you need to restore an entire backup set.
a. Use the drop-down menu to choose the backup that you want to restore from.
b. Use the calendar to select the date you want to restore from.
c. Use the middle panes to expand the backup set.
d. Select the data to restore.
e. Click Restore to at the bottom right of the window.
- The Search tab. Select this tab to search all of the loaded backups for the data you want to restore. You can display data filtered by name, date, size and type, for all backups. The results can be compared (e.g. the dates of two files) to identify the correct data selection.
a. Enter your search term (The search accepts wild card searches, such as *.log or *.doc).
b. Select a filter/s if required.
c. Click the Search button.
d. Select the data to restore.
e. Click Restore to at the bottom right of the window.
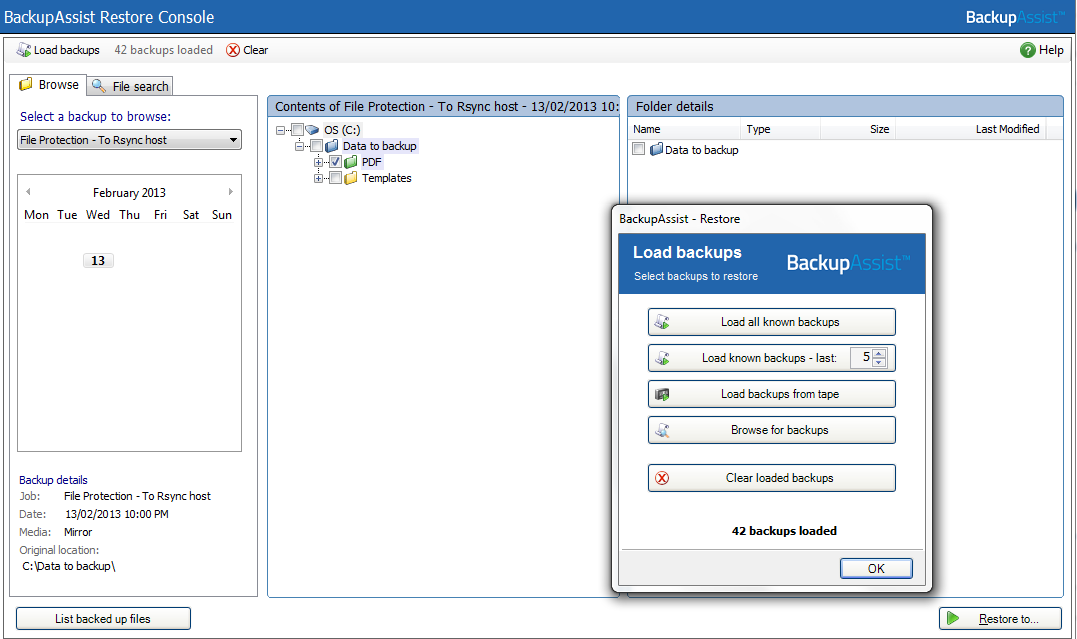
BackupAssist Restore Console - backup and data selection
If the backup is not present, or if you wish to load additional backups, select the Load backups option. Click Load all known backups to load all backup catalogues.
For more information about data selection, refer to the Restore tab user guide.
5. Restore console - restore destination selection
When you select Restore to, a window will open showing the Backup location, the Restore to destination and the Restore options.
a. Review Backup location.
b. Review Restore to: Leave the Original location selected or chose an Alternative path.
Restoring to an alternate location will use a minimal path. For example, restoring a single file to an alternate location will copy the file to the location without re-creating the original folder structure.
c. Review the Restore options:
- Select Overwrite all existing files, Do not overwrite existing files or Only overwrite older files.
- The option, Restore NTFS security attributes will be selected by default.
d. Selecting Create a log file listing all processed files, will create a file that lists the success or failure of each file. The log is opened by selecting the log file’s link in the backup report.
e. Queue all backup jobs when a restore is running, is selected by default.
f. Click the Restore button.
- The Restore Console will connect to your rsync host and restore the selected files.
- The restore will run from the destination window and a Report link will appear once the restore has finished.
g. Select Done.
Your File Protection using rsync restore has now been completed.
Important: Only backups made with BackupAssist v5.3 or later will show up in the Restore Console.
Important: The Restore Console can restore encrypted files, but you will need to supply the password. It is important that you keep a copy of your password in a safe place, as we cannot assist you with opening password encrypted files if your password is lost or forgotten.
Helpful hint: These instructions explain how to restore data using the BackupAssist Restore console. If you do not have BackupAssist installed and need to restore a File Protection backup, you can manually browse the Rsync destination and transfer data back using any method permissible by your host.
File Protection using rsync Backup Management
Once you have created a backup job, you can modify the settings and access advanced configuration options using the management screen.
To access the backup management screen:
1. Select the BackupAssist, Backup tab.
2. Select Manage from the top menu. A list of all backup jobs will be displayed.
3. Select the backup job you want to modify, and select Edit.
4. Select the required configuration item on the left. Key configurations are described below.
To learn more about the backup management options, see the Backup tab user guide.
Rsync options
Select the Rsync options item from the left hand menu. The Rsync options page contains 15 different configurations for backing up your data across the internet including:
- Rsync and SSH command line options.
- Data transfer limits.
- Backup permissions.
- Backup logging and a media usage report.
- Rsync encryption and encryption password.
Rsync Data Seeding
Rsync backups are incremental backups. The first time you perform your backup, no data will exist on your data host so a full backup is required. If you enable or disable encryption for an rsync job, BackupAssist will need to re-seed the backup to the rsync backup destination with a full set of data.
Seeding your backup via an internet connection can take a long time. For this reason, two data seed options are available for rsync host servers that you have local access to. This may exclude third party vendors. Once the initial seed to the data host is complete, each successive backup will be an incremental backup of data that has changed.
Option 1 - Seeding a permanently offsite data host
You can use BackupAssist’s Seed Backup function, to automatically seed data offsite using a removable media, which can be physically transported to the data host so that the data can be uploaded locally.
To seed your data using this method, follow these steps:
1. Connect a removable media device to the machine running BackupAssist.
2. Select the Destination menu item.
3. Click the Seed backup button and select the location of an empty folder on your portable media.
Manage backup jobs screen - Destination seeding
4. Once the seed is complete, your portable media should contain:
- A directory with the seeded data
- A README.txt file containing instructions on how to copy the seed to your rsync server
- An .sh script file, which is used to copy your data to your rsync server.
5. Transport the portable media containing the seed to the site where your rsync server is located.
6. Connect the device to the rsync server and copy the seed to it:
For a Windows server (assuming the seed is located on E:\SeedFolder)
a. Go to the Start menu > CopSSH > Start a Unix BASH shell.
b. Enter the following command: bash "/cygdrive/e/SeedFolder/seed.sh".
For a Linux or Unix server (assuming the seed is located in /mnt/usbdrive/SeedFolder).
a. Run the following command in your shell: bash "/mnt/usbdrive/SeedFolder/seed.sh".
A complete seed of your data should now be copied to your rsync server. Each successive backup from now on will be an in-file delta incremental backup of data that has changed.
Option 2 - Bringing your data host onsite to perform the seed
This method is suitable for "standalone" data hosts (where a data host is not shared among multiple clients) that can be physically transported onsite - such as NAS devices.
Seeding your data is easy - simply follow these instructions:
1. Connect your data host to the LAN and make a note of its IP address / Hostname.
2. Create your BackupAssist rsync job, run it at convenient time and wait for it to complete.
3. Move your NAS to its permanent location.
4. Update the job settings in BackupAssist to reflect the new IP address / Hostname.
Scheduling
Selecting Scheduling will display the Scheduling options. You can use this screen to change the default time and days of your scheme's daily backups. If you selected a scheme with archive backups (e.g. weekly, monthly), you can specify when each archive backup will run. The current scheme is shown, along with two pop-up menus: Select a new schedule and Customize schedule.
Select a new Schedule: This will display the pre-configured backup schemes that you chose from during the creation of your backup job. The selections available will depend on the type of destination media you have selected. You can select a different scheme using this option.
Customize schedule: This selection can be used to modify each backup within your current schedule. The customizations available will depend on the type of backup media used. For File Protection backups, the Method field can only be set to Automatic. This is because single instance store provides the benefit of incremental backups in a full backup format. This technology is managed by BackupAssist and does not require further modification.
For additional information on the Scheduling screen, please refer to the Backup tab user guide.
Files and applications: VSS
The Volume Shadow Copy Service (VSS) is a Microsoft Service that creates a copy of an application's data (e.g. Exchange and SQL) so the data can be backed up without interfering with the application. BackupAssist is a VSS-aware backup client, so it can backup application data using VSS. BackupAssist will automatically detect locally running VSS applications and list them for selection during the Destination step of the backup job creation.
VSS applications are displayed under the Files and applications menu item. You can modify your backup job by selecting entire VSS applications or drilling down to individual components.
In some cases, only applications that are currently running will be detected. If an application is not listed, try re-starting it and then click the Refresh button in BackupAssist.
Open files: VSS writers
If you selected a VSS application, it is recommended that you disable the Enable VSS writers option. If a VSS application is detected, the Volume Shadow Copy Service and Enable VSS writers options will be selected by default. VSS writers contact all applications before and after a backup. This process is slow and can cause the VSS application to register that a backup has been completed when it has not.
Troubleshooting FAQ
Test connection failed : Ensure that you are able to ping your rsync server from your BackupAssist server and that you have opened up the appropriate ports on your firewall. Make sure that the username can access the path you have specified.
SSH Connection Refused : Ensure that the services Openssh SSHD and RsyncServer are started on the data host machine (Administrative Tools > Services). Make sure your firewall is not blocking the attempt.
Register with server failed : Ensure that you have the correct username and password set up on your rsync server.
Data host: The server that has been set up to host backup data.
Client : The machine that BackupAssist is installed on, that sends data to the data host.
SSH Authentication: For SSH communication, we use a public / private key method of authentication, meaning that you will only be asked for your password once (when registering with the server), and your public key will be uploaded to the server, enabling BackupAssist to log into the server in the future in a secure, password-less manner. For more information on public / private key authentication, visit the following Wikipedia article: Wikipedia Public Key Cryptography
Daemon Authentication: In Daemon mode, your password is stored in an encrypted format by BackupAssist and provided every time the backup runs. When running in Daemon mode, traffic will be unencrypted. For this reason, we recommend that you only use closed network environments, such as LANs or WANs connected by a secure VPN. VPNs inherently encrypt communication between nodes, so using rsync in Daemon mode over a VPN is still secure.

